

Start with the right link
Open the Thunderstream panel, enable the necessary tool and go to the overlay gallery or its configuration. Select, for example, alerts, broadcast chat or viewer counter. Save your settings before copying the address.
Copy the link intended for the overlay source. The address of a regular website, administration panel or local preview will not replace this link. Thunderstream overlays are hosted on Thunderstream.net also when you use the desktop program.
A dictionary without difficult abbreviations
| Concept | What does this mean in practice? |
|---|---|
| Scene | Ready-made image layout: e.g. a game with a camera or a break board. The scene you choose determines what you show. |
| Source | One scene component: game, camera, text, audio, or page with overlay. The order of sources determines what covers what. |
| URL | Full web address. Copy it using the button in the panel; do not copy fragments and do not add spaces. |
| Event | New information from the platform, such as a message, observation or gift. The appearance test is not always an actual event. |
| Resolution | The width × height of the area, e.g. 1920 × 1080. This is different than shrinking the source rectangle with the mouse. |
Step by step · 1–4
- Action
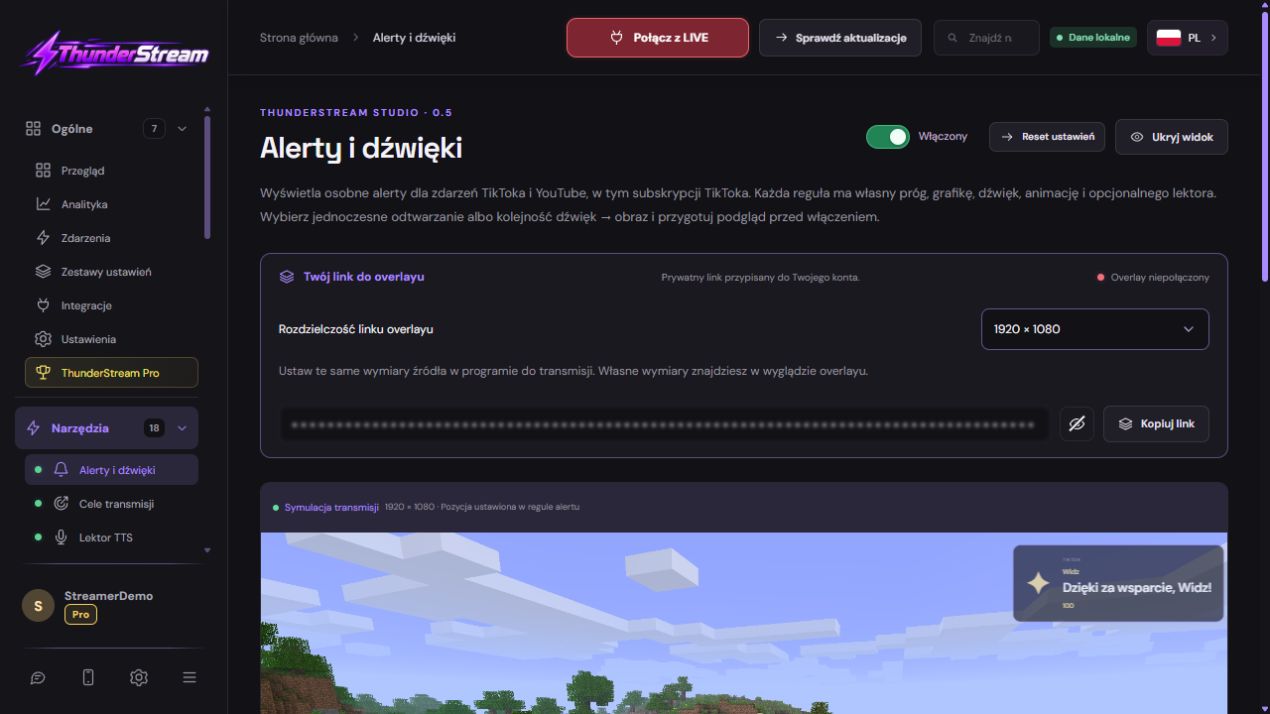
Open Thunderstream and select Overlays in the left menu.
✓ After this step you will seeYou see separate overlays, such as alerts and chat.
- Action
Open the selected overlay and enable its tool.
✓ After this step you will seeThe preview is not obscured by the disabled message.
- Action
Note the width and height of the link, e.g. 1920 and 1080.
✓ After this step you will seeYou have two numbers that you will later enter into the source.
- Action
Save the settings you just changed.
✓ After this step you will seeWhen reopened, the fields retain their values.
 Enlarge the screenshot ↗
Step by step · 5–8
- Action
Click Copy link next to the overlay box.
✓ After this step you will seeHer private address is in the clipboard, not the address of the entire panel.
- Action
In OBS, select the target scene from the Scenes list.
✓ After this step you will seeThe name of the correct scene is highlighted.
- Action
Under the Sources list, click + and then Browser.
✓ After this step you will seeThe creation of a web source opens.
- Action
Select Create new and enter a name, e.g. Thunderstream Chat.
✓ After this step you will seeYou will recognize the source in a later list.
 Enlarge the screenshot ↗
Step by step · 9–12
- Action
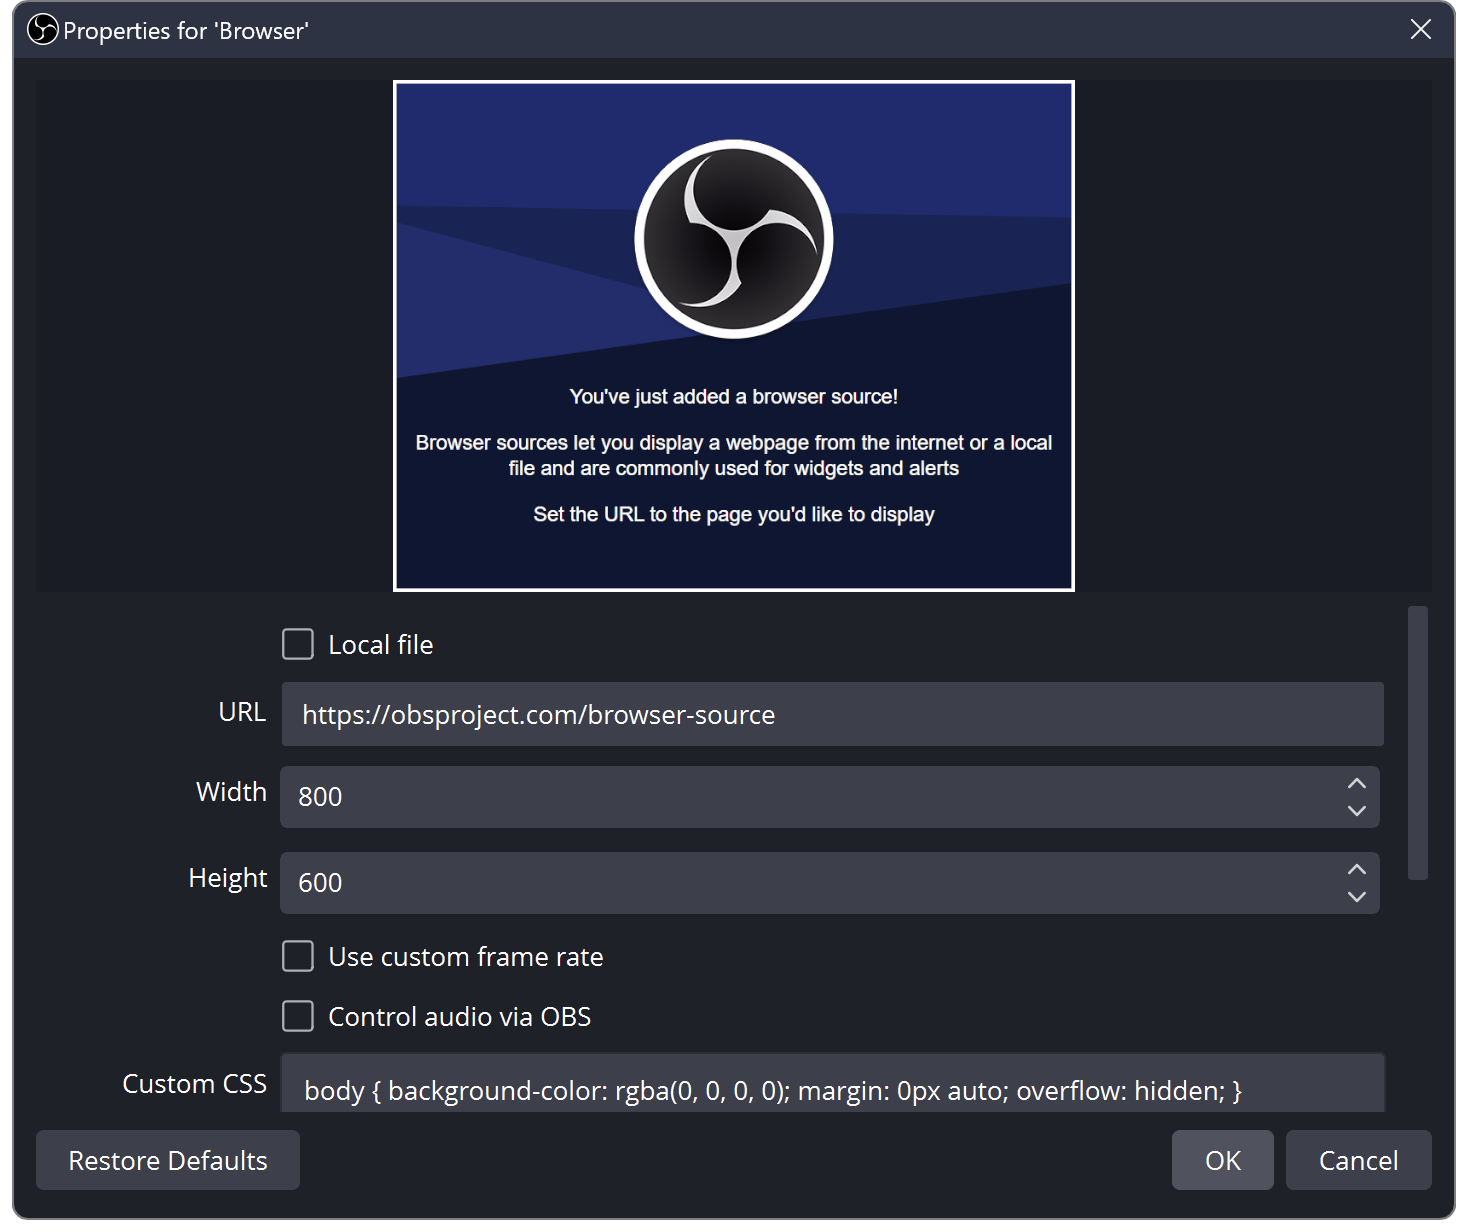
Paste your own URL link; Leave local file disabled.
✓ After this step you will seeThe field contains the overlay address, not the login page.
- Action
Enter the exact width and height you noted.
✓ After this step you will seeThe source area corresponds to the area of the saved overlay.
- Action
Click OK and move the source above the game in the Sources list.
✓ After this step you will seeThe game does not cover the overlay; the eye icon is on.
- Action
Before LIVE, run Test in Thunderstream.
✓ After this step you will seeAn example reaction is seen in scene OBS.
 Enlarge the screenshot ↗
Step by step · 13–16
- Action
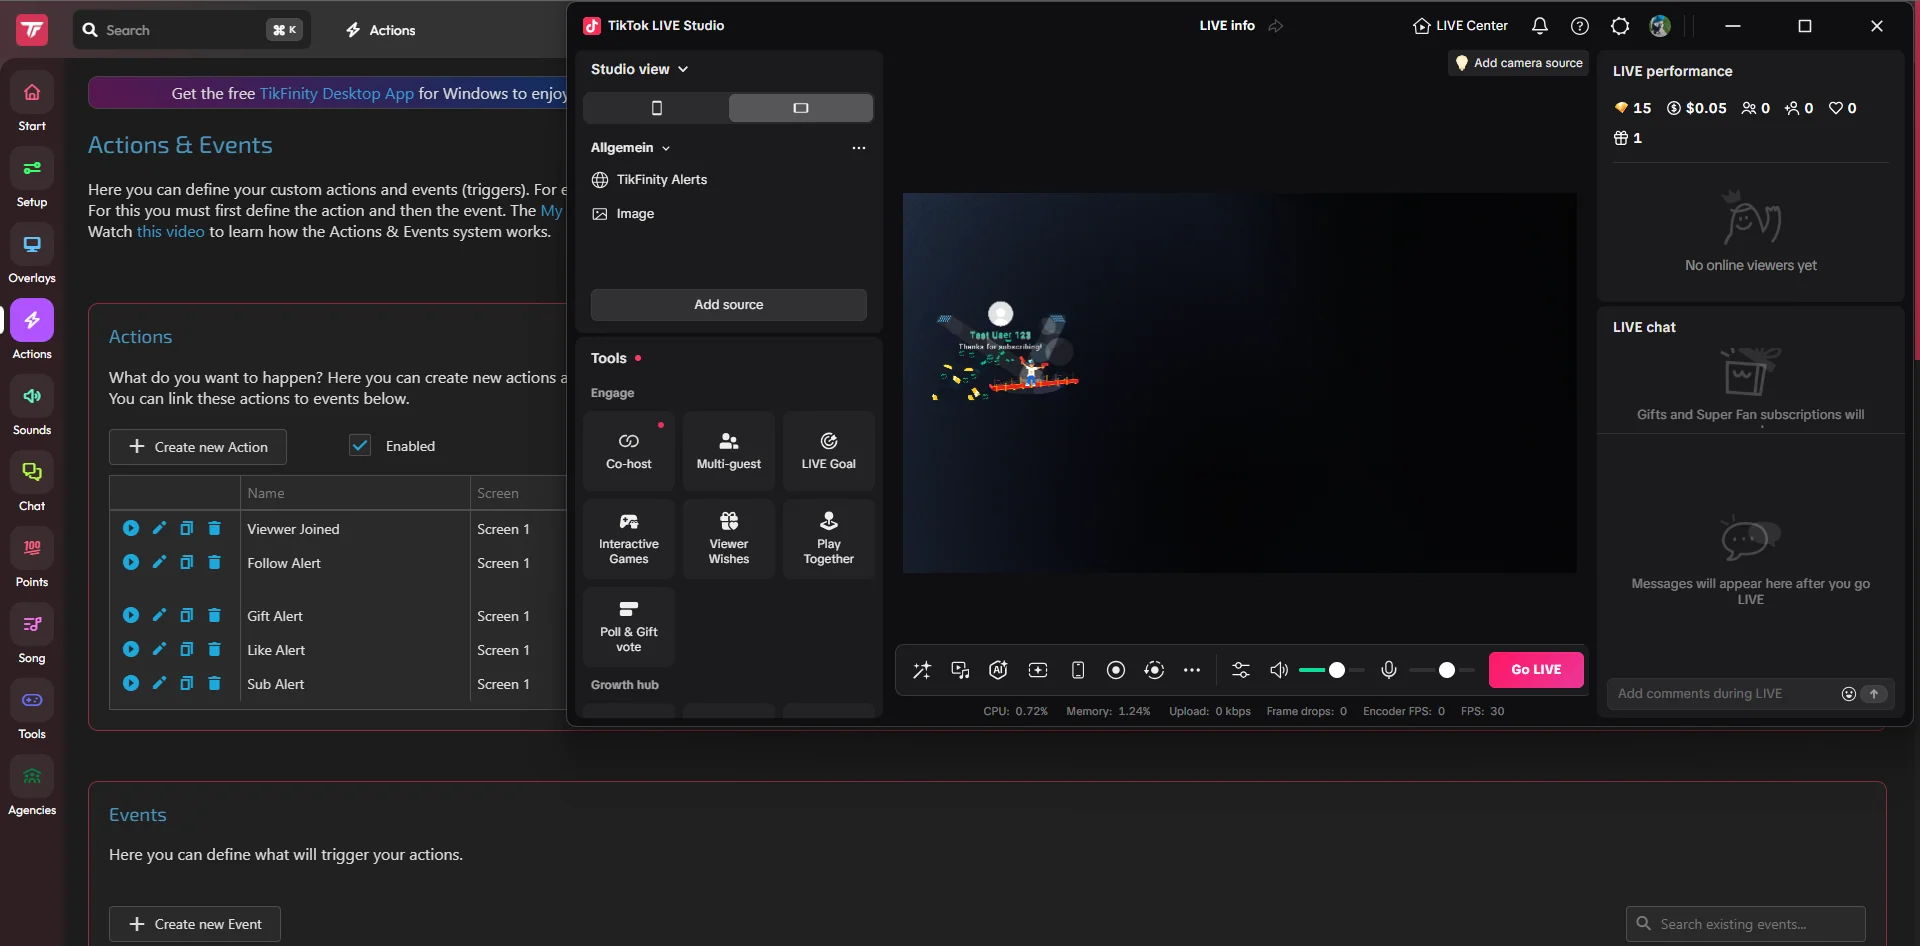
In LIVE Studio, select add source, then Link.
✓ After this step you will seeIn the supported version, the web address field opens.
- Action
Paste your link and set a compatible area and then a layer above the game.
✓ After this step you will seeThe same test can be seen in the LIVE Studio preview.
- Action
Record 20 seconds locally with one test and microphone.
✓ After this step you will seeThe file shows an overlay and hears one sound.
- Action
Lock the finished source with a padlock.
✓ After this step you will seeAccidental dragging does not move the overlay.
An example you can reproduce
The horizontal scene and link are 1920×1080. An alert set to the far right may disappear in a source that is only 800 pixels wide. Enlarging the red frame of a source in a scene does not change its internal resolution.
First, choose a layout: horizontal or vertical?
The source resolution is the area in which the overlay draws its elements. The size of this area and the size of the rectangle you are dragging your mouse on the scene are two different things. Shrinking the rectangle will not move an element that was previously outside the source area.
In Thunderstream, select the format corresponding to your scene, save the position and only then enter the dimensions in the broadcast program. When changing the format from landscape to portrait, re-check the position of the alert, top and chat. Do not stretch the overlay unevenly, otherwise you will distort the letters and avatars.
| Destiny | Sample source area | Important when setting up |
|---|---|---|
| Horizontal stage | 1920×1080 | Maintain proportions and check the position at the edges. |
| Vertical stage | 1080×1920 | Set items for phone view, not for wide monitor. |
| Own format | Dimensions saved in Thunderstream | The source in OBS or LIVE Studio must have the same dimensions. |
Add the source in OBS Studio
The browser source displays the page, not the recording of your panel. This prevents settings, buttons and private information from getting into the image. Only the contents of the selected overlay should be visible in the scene.
- Select the scene where the overlay should go. In the Sources panel, click the plus and select Browser.
- Create a new source and give it a clear name, such as "Thunderstream - Chat."
- Paste the copied address into the URL field. Leave the local file option disabled.
- Set the width and height according to the Thunderstream panel. For a 1920 × 1080 configuration, enter these exact values.
- Confirm source. In the Sources list, move it over your game or camera capture.
Add the source in TikTok LIVE Studio
The item names depend on the language and edition of LIVE Studio. You are looking for a source that displays the page from the URL. If your version does not support this feature, please check LIVE Studio for updates and help; don't choose a random source that captures your entire desktop.
- In LIVE Studio, select a scene and open add source.
- In the version that supports web sources, select Link or the corresponding source with a URL field.
- Paste the same overlay link from Thunderstream and set the correct dimensions.
- Place the source over the game image and check the position of the elements in the preview.
Arrange sources so that nothing obscures alerts
You can add an existing source to your next scene instead of creating a new independent copy with the same link. Consider this especially for sources that play audio: two active copies may result in double reading. Don't remove a source that is already working properly before checking for a replacement.
- Place the background or game lowest on your list. Add a camera and decorations above them, and place the Thunderstream sources where you want them to be visible in the final image.
- Select the overlay source. If it has been accidentally cropped, check its transformation and cropping. In OBS, use the source context menu and the Transform option; the name depends on the program language.
- Change the location of the alert itself in the configuration of a given alert in Thunderstream. Set X, Y, size and animation, click Save, then test your saved settings.
- Once you have set the source, lock it with a padlock in the source list. This will prevent you from accidentally moving the entire area with alerts when moving the camera.
Save, test and check the sound
Return to Thunderstream and run the saved configuration test. Do it before starting LIVE: simulations may be limited during a real broadcast. Compare the position and size with the streaming program, not just with the in-panel preview.
If audio supports Thunderstream, capture program or desktop audio. Do not simultaneously run a second TTS reading on another panel or source, as recipients may hear an echo. On the OBS, check the meters and make a short local recording.
Sound: panel, program or browser source?
First, determine where the sound is actually coming from. If Thunderstream is playing it, capture the sound of this application or the appropriate system device in the broadcast program. If a browser source is playing it, check its share in the mixer. The selection depends on the playback method set.
Listening in your own headphones and the sound sent to viewers are separate matters. Just because you hear an alert on your computer doesn't confirm it's been broadcast. Make a short recording with a microphone and one test alert, then play it back.
- Run one test and watch which sound meter responds. Make sure this source is not muted.
- Check whether the selected audio path is included in the broadcast output. If you hear two copies, turn off duplicate capture of the same sound.
- Listening to the public LIVE in the second tab mute or use headphones. Sound from the speakers may return to the microphone.
- Match the volume of music and TTS to your voice. In the computer program, you can additionally set the volume to mute the music when the microphone is detected.
Scene change, animation refreshment and smoothness
The browser source has separate options for disabling when hidden and refreshing when the scene is activated. Refresh loads the overlay from the beginning. For items that you want to maintain continuity, do not enable automatic reloading unnecessarily. In turn, an unused overlay does not have to function as several independent copies in many scenes.
Don't increase the frame rate of your source just because your computer has a fast monitor. Match it to your broadcast and check the effect on the recording. For framerate issues, start by deleting unnecessary source copies and closing unused previews rather than refreshing everything during LIVE.
After changing the settings, save them to Thunderstream. Refresh one source only when you really need it. You will avoid accidentally interrupting the animation, music or reading.
Empty source? Check these things out in this order
- Compare the dimensions of the source with the dimensions recorded in Thunderstream. The item may be outside an area that is too small.
- Check the source's visibility icon, its order in the scene, and whether the tool is enabled.
- Verify that the entire current link has been copied and that the account is linked to the real LIVE.
- Remember that an empty top with no participants or an alert waiting for an event may be intentionally invisible. Use the pre-broadcast test.
- If a link or its parameters have been changed, refresh only that source after saving. Do not disconnect a running LIVE unnecessarily.
What do you see on the screen and how to fix it
Fix one thing at a time and try the same thing again. If you change several options at the same time, it will be difficult to determine what solved the problem. Don't delete a working source or entire configuration just because one widget isn't responding.
If you still need help, write down the program name and version, platform, approximate time of trial, expected result, and what actually happened. Attach a dump without passwords, keys and full private links. This description is much more useful than just the "not working" message.
| Symptom | Check first | Do it |
|---|---|---|
| I can see the whole panel. | Pasted the address from the browser bar. | Copy the private link field of a specific overlay. |
| I see Minecraft from the demo. | A preview was used instead of a production link. | Replace the URL with the link of the selected overlay. |
| The source is empty. | No event, disabled tool, or small area. | Check Test, Switch, Dimensions and Layer Order. |
| The overlay is stretched. | The proportions of the rectangle have been changed. | Restore the aspect ratio and adjust the source without stretching one axis. |
Last attempt before use on LIVE
- Save the changes using the button assigned to the edited function. If there are separate forms, check each changed part separately.
- Open the settings again and compare the most important values. Simply moving the slider does not always mean a permanent save.
- Check the result outside the editor itself: on the target scene, in the recording, or in the reopened configuration.
- If the function uses the platform, separately acknowledge the new handled event during the active LIVE. Don't expect the appearance test to confirm account authorization.
- Save the working values and make a copy before the next major change. Next time you start up, start with a quick check.
Before you go live
- Your own link and compatible resolution.
- The source is above the game and the tool is enabled.
- The test can be seen in the streaming program.
- The sound is heard once and is confirmed by a short recording.
- After changing the scene, the source continues to work and does not play a second copy of the sound.
- The broadcast key was not pasted into the overlay source.
- Reopened settings retain the saved values.
- A single attempt is confirmed on the target output.
Frequently asked questions
Will the Minecraft preview from the panel appear on my LIVE?
Do not copy the preview address. The production overlay link shows overlay elements above your scene; the demo background is for setup.
Do I need to have a browser open?
If the panel or program supports TTS, music, or other local operations, leave it running. The source link itself does not replace the LIVE connection and all recovery processes.
Is one link enough for all tools?
Copy the link of the selected overlay type. Separate sources allow you to set alerts, chat and other add-ons separately.
Do I need to paste the transmission key into the overlay?
NO. Source Browser or Link receives the overlay link from Thunderstream. The stream key goes to the broadcast settings in the OBS or other encoder, not to the overlay address.
Why is the alert in the middle of the panel but not visible on LIVE?
Compare the resolution and aspect ratio of both areas. Also check the framing, order of sources, recording the position of a given alert and testing its saved configuration.
What should I do if my screen looks different than the photo?
Check the program name, version and selected feature. The dump is real, but it's from a specific edition and language. Search for a described field by its task. If the option is not available, check the current official support and availability in your account.