What's included?
The kit describes the configuration of tools and appearance. It may include several overlays, so check previews and information about enabled features. The attractive alert image itself does not say what will happen to the music or voiceover.
Check the author, description and information about installations. They are helpful in choosing, but do not replace testing on your stage. A layout prepared for a horizontal image may need to be adjusted for vertical transmission.
A dictionary without difficult abbreviations
| Concept | What does this mean in practice? |
|---|---|
| Set of settings | Save supported options for reuse. It does not replace all files, passwords and platform connections. |
| Scene | Ready-made image layout: e.g. a game with a camera or a break board. The scene you choose determines what you show. |
| Source | One scene component: game, camera, text, audio, or page with overlay. The order of sources determines what covers what. |
| URL | Full web address. Copy it using the button in the panel; do not copy fragments and do not add spaces. |
| Resolution | The width × height of the area, e.g. 1920 × 1080. This is different than shrinking the source rectangle with the mouse. |
Step by step · 1–4
- Action
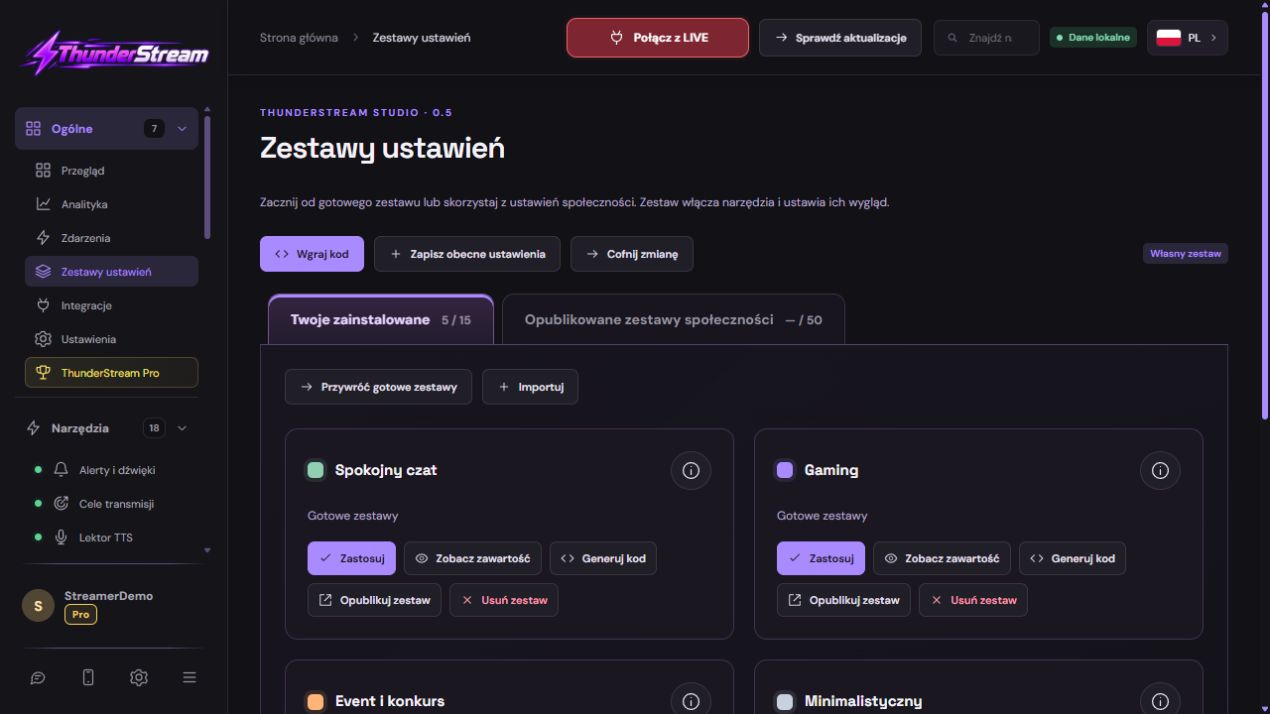
Open Sets.
✓ After this step you will seeYou see installed and published items.
- Action
Save the current configuration as your own set or copy.
✓ After this step you will seeYou have a return point before the change.
- Action
Click Upload Code and paste the code itself.
✓ After this step you will seeThe message description is not part of the code.
- Action
Open content information.
✓ After this step you will seeYou know what tools and settings will be changed.
 Enlarge the screenshot ↗
Step by step · 5–8
- Action
Check the author, description and preview.
✓ After this step you will seePopularity does not replace verification of needs.
- Action
Check the free space and install the kit.
✓ After this step you will seeIt appears in your installed.
- Action
Check all utilities enabled after installation.
✓ After this step you will seeYou don't unknowingly trigger additional reading or sound.
- Action
Match colors and fonts while maintaining contrast.
✓ After this step you will seeThe look is consistent with your scene.
Step by step · 9–12
- Action
Check the availability of graphics and sounds.
✓ After this step you will seeAnother person's private warehouse is not confused with available material.
- Action
Test each active overlay type separately.
✓ After this step you will seeOne alert does not replace trying the chat and timer.
- Action
Compare the resolution and position of the OBS.
✓ After this step you will seeThe kit does not need to change the dimensions of the existing OBS source.
- Action
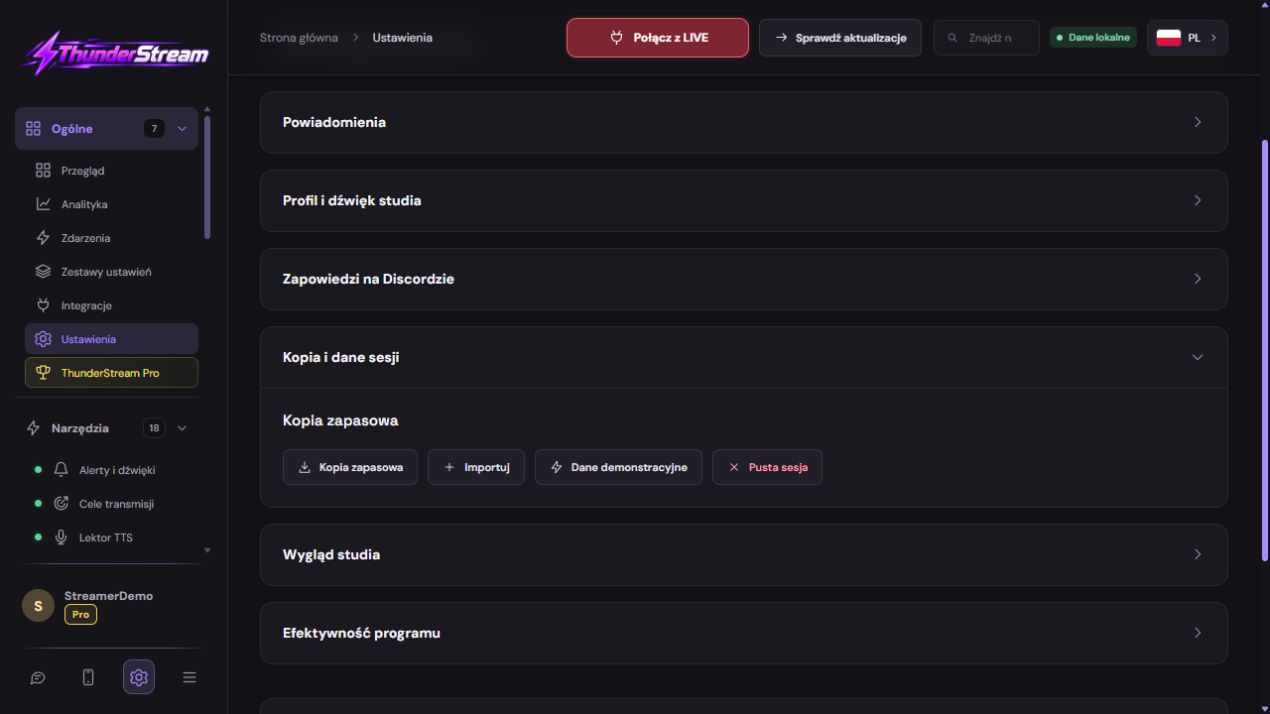
Save your own version with a recognizable name.
✓ After this step you will seeYou won't confuse it with the original.
 Enlarge the screenshot ↗
Step by step · 13–14
- Action
Practice restoring an earlier set.
✓ After this step you will seeYou know how to undo a change before the next LIVE.
- Action
When publishing a set, describe the active tools and limitations.
✓ After this step you will seeThe other person knows what they will receive without revealing private links.
An example you can reproduce
If the headset enables chat, timer and alerts, try three different times. Then go back to the previous set and check what the scene looks like. The ability to fallback is part of the installation, not a task only after a failed LIVE.
Keep the return point
Account settings, platform permissions, and connection to the actual broadcast require your own review. Importing a configuration is not a login to the author's account or a way to obtain author's permissions.
- Save the current tool settings that have been edited.
- Keep your own set or current configuration code if you use this feature.
- Privately note down the names of important sources and how audio is played.
- Choose a quiet moment before LIVE rather than installing an extensive kit during an active alert.
Upload the code and check the result
Your own publication code and private overlay link are different things. The kit code is used to find or install it. You copy your current link, assigned to your account, to the source on the stage.
- In Preset Sets, use Upload Code and paste the full code received from the author.
- Check the information about the recognized set. Don't enter a random sample string from the image as real code.
- Install the kit as prompted and go to Your Installed.
- Check which tools are enabled and that all necessary settings are within the capabilities of your plan.
Match colors, fonts and layout
Change a few of the most important parameters instead of expanding everything at once. You'll maintain a consistent look while making it easier to see which edits are affecting the result.
| Element | What to check after import |
|---|---|
| Colors and gradients | Contrast with the game, camera and creator's logo. |
| Fonts | Polish characters, long nickname and size on the phone. |
| Animations | The entire entry, stay and exit, not just a still view. |
| Location | Source dimensions and position in portrait or landscape orientation. |
| Sound | Volume, single reading and presence on the recording. |
Test every overlay enabled
If the kit includes external material, please check if it is still available. A change on the side hosting the image or sound can affect its operation regardless of the assembly code itself.
- Open the tools enabled by the kit one by one.
- Test your saved alerts, goal, timer and other overlays.
- Add appropriate links to sources in your broadcast program.
- Record a short sequence with microphone, TTS and alert. Make sure you have not activated two backup copies.
Publish your own set with a clear description
Before publishing, name the use, scene format, and features the set enables. Specify whether it is intended for casual chat, gaming, or extensive alerts. The recipient should know what he is installing.
Check the limit of published and installed sets in your plan. Use the available custom code option if unlocked. Don't include passwords, broadcast keys, or private user links in the description or screenshots.
What do you see on the screen and how to fix it
Fix one thing at a time and try the same thing again. If you change several options at the same time, it will be difficult to determine what solved the problem. Don't delete a working source or entire configuration just because one widget isn't responding.
If you still need help, write down the program name and version, platform, approximate time of trial, expected result, and what actually happened. Attach a dump without passwords, keys and full private links. This description is much more useful than just the "not working" message.
| Symptom | Check first | Do it |
|---|---|---|
| The code doesn't work. | Copy error or unavailable publication. | Paste the code itself and confirm publication with the author. |
| Some elements are inactive. | Account limit or exclusion included. | Check the description and Pro markings. |
| Author's material is missing. | No access to his private file. | Select your own file or an available replacement. |
| The layout is off screen. | Different source format. | Compare the dimensions and positions of the aligners. |
Last attempt before use on LIVE
- Save the changes using the button assigned to the edited function. If there are separate forms, check each changed part separately.
- Open the settings again and compare the most important values. Simply moving the slider does not always mean a permanent save.
- Check the result outside the editor itself: on the target scene, in the recording, or in the reopened configuration.
- If the function uses the platform, separately acknowledge the new handled event during the active LIVE. Don't expect the appearance test to confirm account authorization.
- Save the working values and make a copy before the next major change. Next time you start up, start with a quick check.
Before you go live
- Previous configuration retained.
- The contents of the kit and the account plan were checked.
- Sources use their own links and appropriate dimensions.
- Each enabled item was tested after installation.
- Reopened settings retain the saved values.
- A single attempt is confirmed on the target output.
Frequently asked questions
Does the kit code need to be pasted into OBS?
NO. Upload it in the sets tool. A link to a specific overlay from your account is sent to OBS.
Will installing the kit link the author's platform accounts?
Do not treat the kit as an account authorization. Check your platforms and active LIVE separately in settings.
Can I only use part of the kit?
Check your enabled tools and disable unnecessary items, keeping the ones you want to use. Then test your sources again.
What should I do if my screen looks different than the photo?
Check the program name, version and selected feature. The dump is real, but it's from a specific edition and language. Search for a described field by its task. If the option is not available, check the current official support and availability in your account.