

A dictionary without difficult abbreviations
| Concept | What does this mean in practice? |
|---|---|
| Scene | Ready-made image layout: e.g. a game with a camera or a break board. The scene you choose determines what you show. |
| Source | One scene component: game, camera, text, audio, or page with overlay. The order of sources determines what covers what. |
| URL | Full web address. Copy it using the button in the panel; do not copy fragments and do not add spaces. |
| Event | New information from the platform, such as a message, observation or gift. The appearance test is not always an actual event. |
| Resolution | The width × height of the area, e.g. 1920 × 1080. This is different than shrinking the source rectangle with the mouse. |
Step by step · 1–4
- Action
Check the free space on the disk for recordings.
✓ After this step you will seeThe disk has enough space for the planned session.
- Action
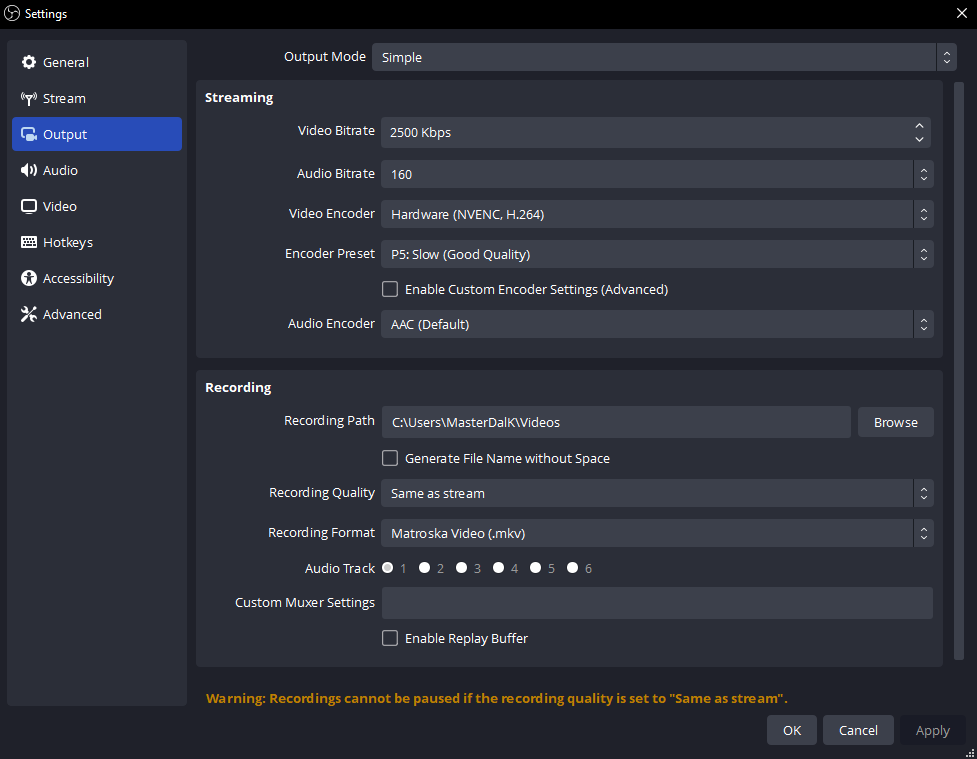
Open Settings → Output → Recording.
✓ After this step you will seeYou see the path and format of the save.
- Action
Select a folder that you can find later.
✓ After this step you will seeYou're not looking for a file in random directories.
- Action
Select a supported format that is more resistant to interruption of recording, e.g. MKV.
✓ After this step you will seeThe recording does not depend on the correct closing of traditional MP4.
 Enlarge the screenshot ↗
Step by step · 5–8
- Action
Choose the quality and encoder for your equipment and do a short test.
✓ After this step you will seeYou check the load before the long LIVE.
- Action
If you are recording multiple audio tracks, select them in the output and source properties.
✓ After this step you will seeThe file has planned audio tracks.
- Action
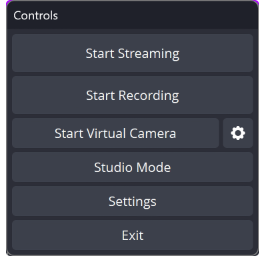
Click Start Recording and record 30 seconds.
✓ After this step you will seeThe actual test file is created.
- Action
Stop recording and play the file.
✓ After this step you will seeYou confirm the image, voice and disk recording.
 Enlarge the screenshot ↗
Step by step · 9–12
- Action
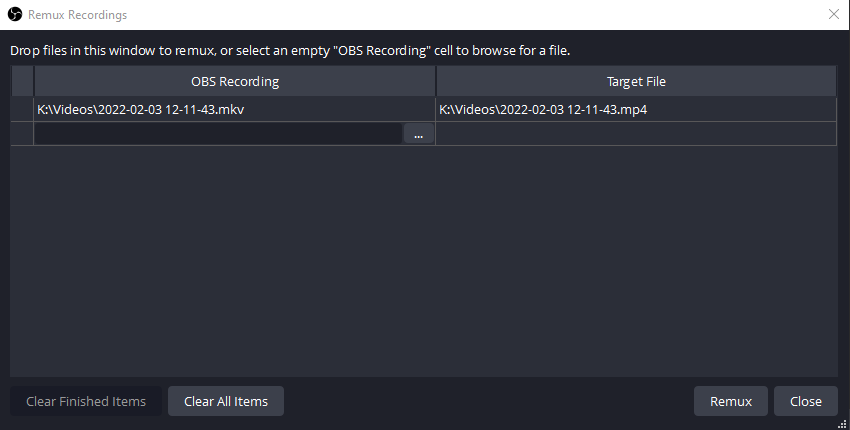
If the editor requires MP4, open File → Repack Recordings, i.e. Remux Recordings.
✓ After this step you will seeYou select a ready-made file, you do not change its extension manually.
- Action
Point to MKV and run repackage to a supported container.
✓ After this step you will seeA file compatible with the editor is created without re-encoding the image.
- Action
In Settings → Output, enable Replay Buffer if available in the selected mode.
✓ After this step you will seeYou can specify the length of the stored fragment.
- Action
Set it to e.g. 30 seconds to start with and check the memory requirements.
✓ After this step you will seeThe buffer has a finite size and purpose.
 Enlarge the screenshot ↗
Step by step · 13–16
- Action
In Settings → Keyboard shortcuts, assign Save replay.
✓ After this step you will seeYou have a shortcut other than regular game controls.
- Action
Run the Replay Buffer and wait for it to collect the material.
✓ After this step you will seeOnly now does he have something to write down.
- Action
Press the shortcut after the test event and open a new file.
✓ After this step you will seeThe saved fragment covers the previous seconds.
- Action
Check the load during simultaneous LIVE and recording.
✓ After this step you will seeThe settings do not cause encoding overload.
Recording, container and repacking
Recording saves material from start to stop. A container, such as MKV or MP4, is a wrapper for image and audio tracks. Repacking changes the packaging without re-coding, so it is not the same as exporting from the assembly program.
With traditional MP4, interrupting the program before it is finished can make it difficult to read the entire file. OBS provides various formats, including newer version-dependent variants. For a simple, testable start, choose a supported format and do a remux test before the important recording.
The cache consumes resources even before you save the file
The replay buffer stores the most recent fragment so that it can be saved after the event. Longer time and higher quality require more memory. Do not set several minutes straight away without checking the equipment.
Recording concurrently with LIVE may increase overhead, especially when encoded separately. Watch your OBS stats during real game traffic. If overload occurs, change a single parameter and compare the sample. Save some space for your files before you start.
An example you can reproduce
For a 30 second buffer, run it, wait over 30 seconds, say "important moment" and press the save shortcut. A file should be created that includes the previous fragment. Simply enabling the buffer does not automatically save each moment as a separate file.
What do you see on the screen and how to fix it
Fix one thing at a time and try the same thing again. If you change several options at the same time, it will be difficult to determine what solved the problem. Don't delete a working source or entire configuration just because one widget isn't responding.
If you still need help, write down the program name and version, platform, approximate time of trial, expected result, and what actually happened. Attach a dump without passwords, keys and full private links. This description is much more useful than just the "not working" message.
| Symptom | Check first | Do it |
|---|---|---|
| There is no repetition | The buffer has not been started | Start the buffer, wait for the material and use the save shortcut. |
| The file is very short | The write occurred just after the buffer started | Wait until the full fragment is collected. |
| The editor does not see MKV | Unsupported container | Repack the file via Remux OBS. |
| The disk is filling up quickly | High quality and long recordings | Measure sample size and plan space. |
| Sound is missing | Wrong recording tracks | Check your mix and selected tracks on a new rehearsal. |
| LIVE stutters when recording is started | Extra coding overhead | Check the statistics and choose lighter settings. |
Last attempt before use on LIVE
- Save the changes using the button assigned to the edited function. If there are separate forms, check each changed part separately.
- Open the settings again and compare the most important values. Simply moving the slider does not always mean a permanent save.
- Check the result outside the editor itself: on the target scene, in the recording, or in the reopened configuration.
- If the function uses the platform, separately acknowledge the new handled event during the active LIVE. Don't expect the appearance test to confirm account authorization.
- Save the working values and make a copy before the next major change. Next time you start up, start with a quick check.
Before you go live
- You know what the fields and units you use mean.
- The most important values were saved and checked again.
- The attempt was graded on the finished output, not just in the editor.
- The image is clear and each sound plays only once.
- Working configuration and safe copy preserved.
Frequently asked questions
There is no replay - what to do?
The buffer has not been started. Start the buffer, wait for the material and use the save shortcut.
The file is very short - what should I do?
The write occurred just after the buffer started. Wait until the full fragment is collected.
The editor doesn't see MKV - what to do?
Unsupported container. Repack the file via Remux OBS.
The disk is filling up quickly - what should I do?
High quality and long recordings. Measure sample size and plan space.