

Prepare before you start
Follow the numbered actions in order and compare your screen or recording with each expected result. Menu names can differ between application versions. Arrows show the order of settings and choices, not a claim that every account offers the same controls.
A dictionary without difficult abbreviations
| Name | After this step you will see |
|---|---|
| Framing | 9:16 → 1080 × 1920 px; 16:9 → 1920 × 1080 px |
| FPS | 30 FPS = 30 × frames / 1 s |
| Mb/s · MB/s | 1 Mb/s = 1000 kb/s; 1 MB/s = 8 Mb/s |
Step by step · 1–4
- Action
Write down: Idea → 1 × Problem.
✓ After this step you will seeAfter this step you will see: Promise.
- Action
Select or set: Framing → 16:9 / 1920 × 1080.
✓ After this step you will seeAfter this step you will see: 16:9 / 1920 × 1080.
- Action
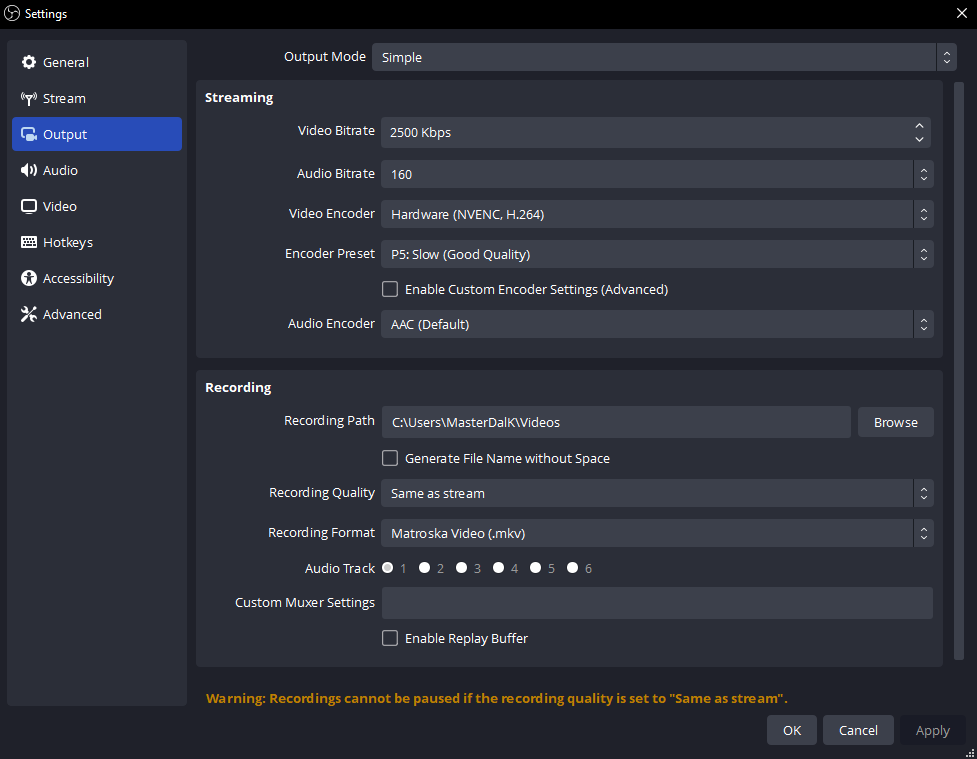
Select or set: Recording → OBS → Settings → Output → Recording.
✓ After this step you will seeAfter this step you will see: Recording.
- Action
Select or set: File format → MKV / Hybrid MP4.
✓ After this step you will seeAfter this step you will see: Editor support.
 Enlarge the screenshot ↗
Step by step · 5–8
- Action
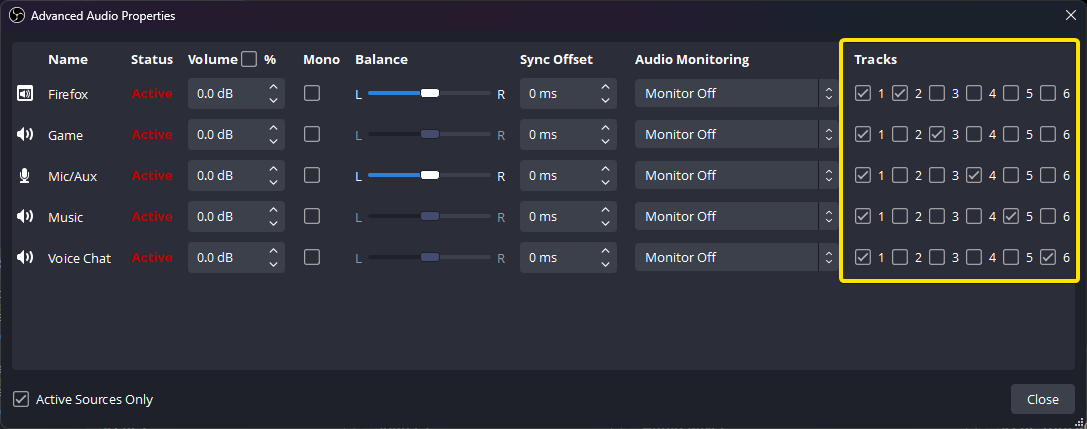
Select or set: Audio → Voice / Music.
✓ After this step you will seeAfter this step you will see: Voice | Music.
- Action
Test: Recording → 30–60 s.
✓ After this step you will seeAfter this step you will see: Synchronization.
- Action
Record: Demonstration → Recording · 15–30 s.
✓ After this step you will seeAfter this step you will see: Evidence.
- Action
Copy: Backup → Source files.
✓ After this step you will seeAfter this step you will see: Backup.
 Enlarge the screenshot ↗
Step by step · 9–12
- Action
Edit: Timeline → Editing → Duration (s).
✓ After this step you will seeAfter this step you will see: Problem → Evidence → Results.
- Action
Select or set: Export → H.264 / MP4 / AAC.
✓ After this step you will seeAfter this step you will see: Platform → Sources and licenses.
- Action
Test: Export → Viewer output · A / B.
✓ After this step you will seeAfter this step you will see: Viewer output.
- Action
Upload: Visibility → Private.
✓ After this step you will seeAfter this step you will see: Usage rights + File.
 Enlarge the screenshot ↗
Settings · Context
| Action | After this step you will see | Context |
|---|---|---|
| Recording | MKV / Hybrid MP4 | Editor support |
| Audio | Voice | Music | Synchronization |
| Export | H.264 / MP4 / AAC | Platform → Sources and licenses |
| Backup | Source files | Source files |
Quick setup · Short test
For a five-minute tutorial, record the problem, the demonstration and the finished result separately. Remove loading waits and mistakes while keeping the explanation understandable without the original livestream. Listen to the whole export, including its ending and moments when speech overlaps music.
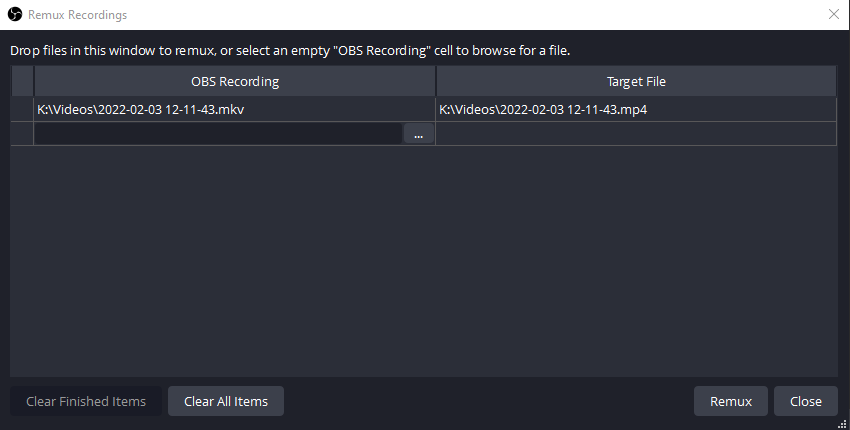
Remuxing changes the container; it does not repair the media. Separate tracks help editing, but some simple players play only one. Check the file in your editor and confirm which audio reaches the final export. Keep the original after the first export.
- Select or set: Recording → OBS → Settings → Output → Recording.
- Test: Recording → 30–60 s.
- Edit: Timeline → Editing → Duration (s).
- Upload: Visibility → Private.
Before you go live
Keep your existing configuration and original source file first. Change one parameter at a time. Check a short recording or the actual viewer output, rather than relying only on the editor. Restore the recorded baseline if the result gets worse.
- One change at a time → Baseline.
- Viewer output → Short test.
- Results → Backup.
Before you go live
- Baseline ✓
- Usage rights ✓
- Viewer output ✓
- Backup ✓
- One change at a time ✓
Frequently asked questions
Prepare before you start?
Account / Source files. Baseline → Backup. Short test → Viewer output. Write down: Idea → 1 × Problem.
Stop and check?
After this step you will see: Usage rights + File. Keep your existing configuration and original source file first. Change one parameter at a time. Check a short recording or the actual viewer output, rather than relying only on the editor. Restore the recorded baseline if the result gets worse.
Context?
Record a short original sample before the whole episode. Check which formats your editor supports. OBS can remux MKV into MP4 without encoding the video again. Keep the original and listen to the exported file.