

Before you choose a platform
Prepare the stage, the correct microphone and image source. Use the current version of OBS from the official project website. If you don't know the capabilities of your computer and connection yet, start with the automatic configuration wizard, not with the maximum settings from someone else's guide.
For each service, you need broadcasting permissions for that account. OBS login, Thunderstream transmission key and authorization have different roles. Don't paste the app ID or secret in place of the stream key.
A dictionary without difficult abbreviations
| Concept | What does this mean in practice? |
|---|---|
| Scene | Ready-made image layout: e.g. a game with a camera or a break board. The scene you choose determines what you show. |
| Source | One scene component: game, camera, text, audio, or page with overlay. The order of sources determines what covers what. |
| URL | Full web address. Copy it using the button in the panel; do not copy fragments and do not add spaces. |
| Event | New information from the platform, such as a message, observation or gift. The appearance test is not always an actual event. |
| Resolution | The width × height of the area, e.g. 1920 × 1080. This is different than shrinking the source rectangle with the mouse. |
Step by step · 1–4
- Action
Set up a simple scene with an image and a microphone.
✓ After this step you will seeIn the preview, you see content intended for viewers.
- Action
Open Settings → Stream in OBS.
✓ After this step you will seeYou see the selection of the broadcasting service, not the source Browser.
- Action
For Twitch, select the Twitch service.
✓ After this step you will seeAccount linking or using a key is available.
- Action
When you connect your account, check your login in the Twitch window.
✓ After this step you will seeThe consent applies to the intended channel.
 Enlarge the screenshot ↗
Step by step · 5–8
- Action
If you use a key, download it from your own creator dashboard.
✓ After this step you will seeYou have your channel's secret key, not someone else's example.
- Action
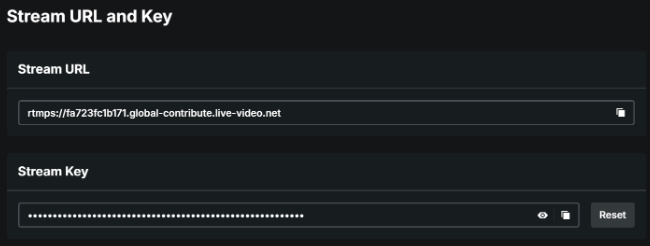
For Kick, open the creator panel, Channel → Stream URL and Key.
✓ After this step you will seeThere are two separate fields: the server address and the key.
- Action
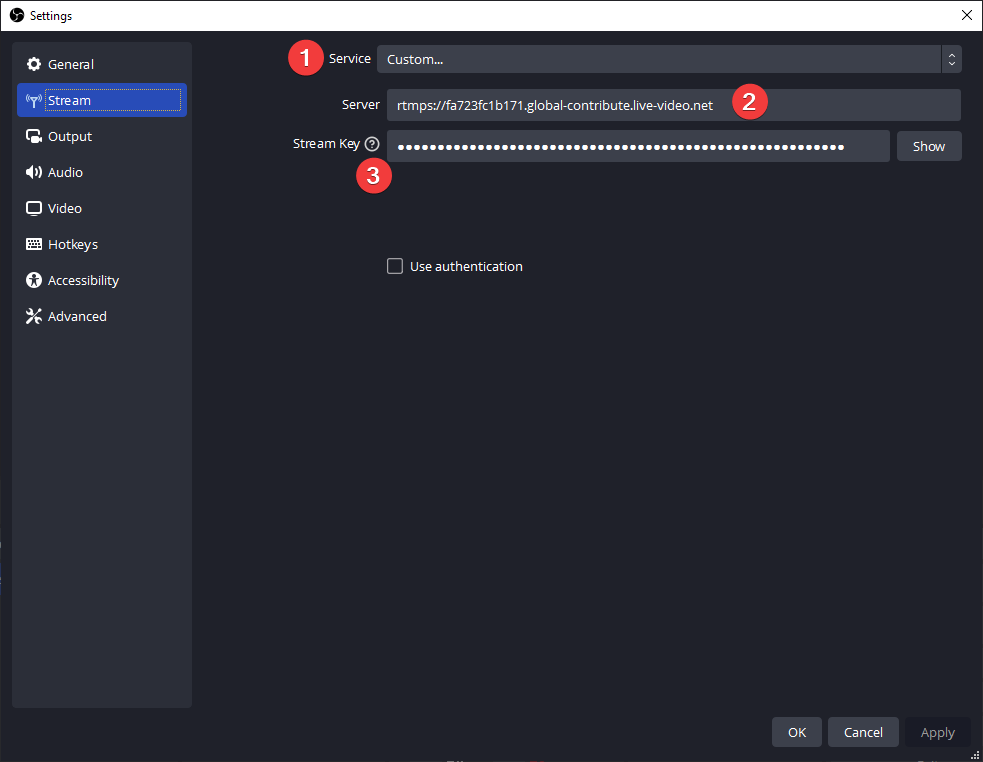
In the manual configuration of the OBS, select the Custom service.
✓ After this step you will seeThe Server and Stream Key fields appear.
- Action
Paste the server into Server and the key into Stream Key.
✓ After this step you will seeEach value goes to its own field.
 Enlarge the screenshot ↗
Step by step · 9–12
- Action
In the Kick panel, enter a title and category.
✓ After this step you will seeThe channel has updated broadcast information.
- Action
For YouTube, in YouTube Studio, go to Create → Broadcast Live.
✓ After this step you will seeThe LIVE control center opens.
- Action
Select the encoder broadcast and the appropriate event.
✓ After this step you will seeThe name and visibility match your sample.
- Action
Merge YouTube into OBS or paste the encoder data of the selected event.
✓ After this step you will seeYou are transmitting to the intended channel and broadcast.
Step by step · 13–16
- Action
Click Apply and OK after entering your details.
✓ After this step you will seeThe settings remain after closing the window.
- Action
First, make a local recording of movement and speech.
✓ After this step you will seeThe image and audio are correct regardless of the Internet.
- Action
Click Start Stream in OBS.
✓ After this step you will seeThe transmit counter and sent bitrate start.
- Action
Check out the platform preview; in YouTube confirm start if you are not using autostart.
✓ After this step you will seeThe right player really shows off your scene.
 Enlarge the screenshot ↗
Step by step · 17–18
- Action
On the other device, listen for a few seconds with headphones.
✓ After this step you will seeYou confirm the image and single sound.
- Action
Mute the public player on the broadcasting computer.
✓ After this step you will seeThe returning stream sound does not create an echo.
An example you can reproduce
The channel address Kick.com/name is for viewing. The RTMPS://… address from the creator panel goes to the Server field in OBS. The secret key goes to Stream Key. The Thunderstream overlay link goes to the Browser source. These values do not replace each other.
Server address and key: two fields with different tasks
The server address indicates where the image is received. The Broadcast Key assigns broadcasting to your channel or selected broadcast. When connecting an account, some of this data may be completed automatically; with manual configuration, you copy them from your own platform panel.
Do not paste the channel page address into the Server field. Also, do not add the key to the end of the address if OBS shows a separate field for the key. Select the entire previous value and replace it with the new one, instead of adding another fragment.
| Data | Where to find them | Where to use them |
|---|---|---|
| Server address/Stream URL | Broadcasting panel of the selected platform. | OBS → Settings → Stream → Server, if the field is visible. |
| Stream Key | The creator panel or platform control room. | Transmission Key field in the broadcast program. |
| Link overlay Thunderstream | Overlay gallery or tool configuration. | Source Browser/Link on stage, not broadcast settings. |
| Application ID and secret | Integration development panel. | They are not a transmission key and are not used to simply start the LIVE in the OBS. |
Twitch: Find the key and set OBS step by step
If the key has been exposed, reset it in the same section of Twitcha and correct the data in the encoder. The old key then no longer fits. Don't reset the key on every regular startup - check your selected account and settings first.
- Log in to Twitchu with the account you want to broadcast from. Open Creator Panel, then Settings → Stream.
- Find the Primary Stream Key in the English Primary Stream Key interface. Use Copy - you don't have to show it on the screen to copy the key.
- In OBS, open Settings → Stream and select Twitch. You can use Link Account if this option is available, or connect using a key.
- For manual configuration, paste the key into the appropriate field. Apply the changes and verify that the correct service is set.
- Set the title and category in the creator panel. Start uploading with OBS and preview your channel.
Kick: Copy the server and key separately
If your version of OBS offers out-of-the-box Kick integration, please follow its screen. The custom configuration described uses two separate values from the panel. After resetting the key using the Reset button, update it in OBS as well.
- Open the Kick Creator Panel in the appropriate account. Select Channel → Broadcast URL and Key. In the English menu it is Channel → Stream URL and Key.
- Copy the server address. In OBS, go to Settings → Stream, select Custom and paste the address into the Server field.
- Return to Kick, copy the transmission key and paste it into the separate Transmission Key field in OBS. Confirm with the Apply button.
- In the Kick panel, complete the title and category, save the broadcast information, and then start sending in OBS.
- Check the image and sound on your channel. When finished, stop streaming in OBS.
YouTube: select a broadcast and download its key
The first broadcast activation on YouTube may take up to 24 hours. Please check your account messages before your first attempt. Also set the visibility of the broadcast consciously: non-public material is suitable for testing with a link, but it is not a private local recording.
- Log in to YouTube Studio and check your avatar and channel name. If there are several channels, select the one on which LIVE should last.
- Click Create → Go Live. In the control room, select encoder transmission. If you are preparing a scheduled LIVE, open the appropriate event.
- Find the broadcast settings: server address and broadcast key section. Select the key assigned to this LIVE and copy the values you need.
- In OBS, select YouTube / YouTube RTMPS. Connect an account and select a channel or use manual configuration with a key. Complete your own server and key fields according to the YouTube panel.
- Start sending in OBS, wait for the preview in YouTube Studio and check the transmission status. If auto start is disabled, start LIVE in the control room as well.
YouTube: key reset, scheduled LIVE and auto start
The key and the event are not the same. After preparing the new LIVE, make sure that OBS sends to the key you selected in this event. When you switch configurations, don't assume it's still using the previous recording's data.
Automatic start and stop options determine whether sending from the encoder starts or ends the broadcast without an additional click in the panel. Also review them after copying the settings from a previous broadcast.
If you need a new key, in YouTube Studio, open Create → Broadcast Live, go to the broadcast section and use Reset next to the hidden key. Copy the new value to the encoder. You need permissions from the channel owner or manager.
TikTok: LIVE Studio and key broadcast access
TikTok LIVE Studio can broadcast after logging in to an account authorized to LIVE. Do not confuse this with manual server configuration in OBS. To add an overlay in LIVE Studio you use the Thunderstream link, not the stream key.
If TikTok enables broadcasting from an external encoder on your account, find the server and key data as well as instructions for this method of transmission in the current LIVE panel. Only use the data shown for your account. The availability of this option depends on the account and the current capabilities of the TikTok.
If you don't see this data, there is no single public key you can paste in its place. Check available sending methods and TikToka help. In the meantime, configure the Thunderstream overlay in a supported Link source in LIVE Studio.
The most important test: can the viewer really hear you?
Moving meters are a good start, but they are not a substitute for listening. Record a short clip locally, say a few words and trigger one sound or alert test. Play the recording and check if the microphone is not too quiet and the music is not drowning out your voice.
If you use Thunderstream, its audio must go to the app or desktop capture source. Choose one way to restore TTS and alerts to avoid creating two overlapping copies.
Resolution, bitrate and stable connection
The overlay area, OBS canvas and upload resolution are different settings. Overlay may be configured correctly and the stream may still drop frames due to too heavy encoding or weak sending.
Start with the OBS auto-configuration wizard and check the recommendations of your chosen platform. Don't choose bitrate based solely on internet downloads: streaming uses uploads. Leave room for connection variability and other devices on the network.
In OBS, watch statistics and messages. Network issues, encoder overload, and slow rendering have other causes. Lower the load one change at a time and repeat the short test. The trial pattern should contain image movement and sound, just like the actual LIVE.
For YouTube, select parameters for resolution, frame rate and codec according to the current platform table. Do not use one bitrate number for all websites and formats.
What about broadcasting to multiple platforms?
Simultaneous reception of four chats in Thunderstream does not mean automatic sending of the image to four services. For such broadcasting, you need properly configured outputs or a multi-stream service and sufficient connection and computer resources.
Start with one proven platform. When adding another one, compare the current requirements and rules of both websites. In case of problems, check the correctness of the key, the selected service and sending stability; do not change several settings at once.
OBS not connecting? Check the cause one by one
Don't post your key when asking for help. All you need is the name of the platform, a message, the time of the attempt and a description of the stage that does not work. Take a settings dump with the key completely hidden.
After a successful attempt, save the configuration. For the next LIVE, check for changed items rather than setting everything up again. To Thunderstream, connect the same account and current broadcast to which you are currently sending the image.
| Symptom | What to check first |
|---|---|
| Invalid key or lack of authorization | Correct account, current key, no spaces added, reconnecting the account in OBS. |
| OBS is sending but the channel is not live | Selected event, pickup preview and required start button on the platform side. |
| Viewers can't hear music or TTS | The right sound source, mute and track sent for transmission. |
| Chat only works on one platform | Connection and platform filter in Thunderstream; separate chat test of each website. |
| After changing the key it stopped working | Updating all encoders using the previous key. |
What do you see on the screen and how to fix it
Fix one thing at a time and try the same thing again. If you change several options at the same time, it will be difficult to determine what solved the problem. Don't delete a working source or entire configuration just because one widget isn't responding.
If you still need help, write down the program name and version, platform, approximate time of trial, expected result, and what actually happened. Attach a dump without passwords, keys and full private links. This description is much more useful than just the "not working" message.
| Symptom | Check first | Do it |
|---|---|---|
| OBS does not connect. | Incorrect server, key or encoder parameters. | Compare the fields with your own dashboard and change one thing at a time. |
| YouTube receives the preview but does not show LIVE. | The event is waiting to start or has different visibility. | Check the status in the YouTube control center. |
| After resetting the key there is an error. | OBS stores the old key. | Change it in the profile you are using and confirm. |
| Another event is broadcasting. | A different channel or transmission key has been selected. | Compare the account and event name. |
Last attempt before use on LIVE
- Save the changes using the button assigned to the edited function. If there are separate forms, check each changed part separately.
- Open the settings again and compare the most important values. Simply moving the slider does not always mean a permanent save.
- Check the result outside the editor itself: on the target scene, in the recording, or in the reopened configuration.
- If the function uses the platform, separately acknowledge the new handled event during the active LIVE. Don't expect the appearance test to confirm account authorization.
- Save the working values and make a copy before the next major change. Next time you start up, start with a quick check.
Before you go live
- The right service and the right channel in OBS.
- Current key from your own panel, if you use one.
- The scene has an image and the correct microphone.
- The platform receives a preview and the test recording has the correct sound.
- The server and key have not been swapped.
- The correct LIVE has been selected and automatic start and stop has been consciously set.
- It is known in which program TTS and the music are playing and how this sound is transmitted to the broadcast.
- Reopened settings retain the saved values.
- A single attempt is confirmed on the target output.
Frequently asked questions
Is a stream key the same as an app secret?
NO. The transmission key identifies the reception of your image. The secret of the application concerns development integration and is not a field for simply running a stream in OBS.
Do I need to link the account separately in OBS and Thunderstream?
Such connections play other roles. OBS sends video and audio, and Thunderstream receives data needed by tools. Configure both parts for the same channel.
What to do when OBS sends an image but the platform still does not show it?
Check the selected channel and scheduled transmission, reception status and required confirmation of LIVE on the platform. Also verify that you are not using an old key.
Does the key need to be changed before each LIVE?
Usually not. Use the key selected for the current channel or event. Reset is needed, among others: after revealing the key; then update all programs that use it.
Why did the key work yesterday but not today?
Check the reset, account change, selected event and current key in the platform panel. Don't paste an old value from a message or document.
What should I do if my screen looks different than the photo?
Check the program name, version and selected feature. The dump is real, but it's from a specific edition and language. Search for a described field by its task. If the option is not available, check the current official support and availability in your account.